
Roofing Components: What is Step Flashing?
Your roof consists of a ton of different components that serve specific roles. One of the most critical and difficult components to install is your step flashing. When rain starts to pour, water can easily seep underneath your shingles where your shingles meet the chimney or a side wall. The solution: step flashing.
What is step flashing?
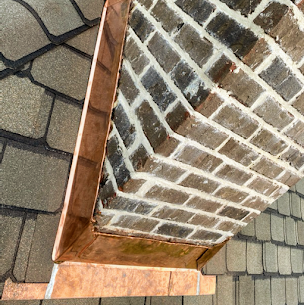
Step flashing is a L-shaped metal flashing that is used where roofs meet vertical surfaces. Step flashing comes in different sizes, but the most common is 4” x 4” x 8” long. In order to understand it’s use, think about a chimney for a second. Shingles are installed around the chimney, but at the edge of the shingle that touches the chimney, there is a small gap. The shingle waterproofs the roof surface, but when it rains, water will seep under the edge of the shingle that touches the chimney and it has nowhere to go. Therefore, a leak is created. This is where step flashing is installed. The step flashing will create a channel that will continue to push that water down the roof and stop it from seeping in at that transition. When water goes underneath the shingle, it will hit the step flashing and roll on to the shingle below. Step flashing acts as the primary defense against water intrusion in the most leak prone areas like chimneys, walls, and skylights.
What is it made out of?
Step flashing comes in many different materials. The most common and cheapest kind of step flashing is aluminum. Aluminum step flashing is durable and will never rust, but it is very flimsy and can be damaged easily during installation. The second most common step flashing material is galvanized steel step flashing. This is much thicker and stronger, but it can rust over time. Finally, there’s copper step flashing. This step flashing can technically last forever as long as it does not come in contact with metals that are not copper. Copper is the most expensive material to make step flashing out of, but it works great on lifetime shingles and designer shingles.
How is step flashing installed?
In order to install step flashing properly, you have to think about how water runs. Water will always run downhill, with gravity, and will find the path of least resistance. Let’s look at the chimney again. Since you roof from the bottom of a roof to the top, once you hit the side of the chimney, you will put your first piece of step flashing down. Then you will put a shingle on top of it. After that, another piece of step flashing will go over the back of that shingle with another shingle installed on top. This pattern repeats all the way up the side of the chimney until you reach the top side of the chimney where another special piece of flashing is installed. Step flashing can be installed under stucco, siding, and various other materials. If it is installed on brick, you must install a counter flashing over the step flashing to stop water from running behind the top of your step flashing.
This was just a basic explanation of what step flashing is and what it does. If you are researching these things to help you make the right decision when buying a new roof for your home, give the experts a call at Restoration Roofing. We would love to help you get the new roof you deserve. Restoration Roofing is a fully insured and BBB A+ rated company offering a range of roofing, skylight, and gutter services. To schedule a complimentary digital roof inspection, give us a call at 901-854-3402, or contact us online. We are happy to be your go to local Memphis roofer and the surrounding Mid-South! To see more updates from Restoration Roofing, check out our Facebook page.


